Getting Started with Tarantula Drawing
Embarking on the journey of drawing a tarantula can be a rewarding experience, blending the challenge of capturing intricate details with the satisfaction of bringing a fascinating creature to life on paper. This guide is designed to provide a clear, step-by-step approach, perfect for beginners and those looking to refine their skills. Before diving into the actual drawing, it’s crucial to gather the right supplies and understand the basic anatomy of a tarantula. This will set a solid foundation, allowing you to create a realistic and visually appealing drawing. Remember, patience and practice are key – embrace the process, and enjoy the journey of learning how to draw these amazing arachnids.
Gathering Your Supplies
Having the right tools can significantly impact the quality and enjoyment of your drawing. It’s not about expensive equipment but choosing the right tools that suit your style and the subject matter. For drawing a tarantula, you don’t need a vast collection of art supplies, but a few key items will make the process much smoother and more enjoyable.
Choosing Your Paper and Pencil

The foundation of any drawing starts with the paper and pencil. For beginners, a smooth, medium-weight drawing paper is ideal. It provides a good surface for pencil work and allows for easy erasing. As you progress, you might explore different textures, such as heavier paper or toned paper, to add depth and character to your drawings. Pencils are graded on a scale from H (hard) to B (soft), with HB being a good starting point. H pencils are great for initial sketches because they leave light marks that are easy to erase. B pencils are softer and produce darker lines, perfect for shading and adding details. A set with varying grades of pencils will give you more control over the tones in your drawing.
Recommended Drawing Tools
Beyond paper and pencils, other tools can enhance your drawing experience. A good quality eraser is essential for correcting mistakes and creating highlights. A kneaded eraser is particularly useful because it can be molded into different shapes, allowing you to erase small areas precisely. A blending stump or tortillon is great for smoothing out pencil strokes and creating soft gradients. A ruler can help with measuring proportions and drawing straight lines. Finally, consider a pencil sharpener to keep your pencils in top condition. These simple tools are all you need to start drawing.
Basic Tarantula Anatomy
Before you start drawing, understanding the basic anatomy of a tarantula is crucial. Tarantulas, like all spiders, have two main body sections: the cephalothorax (fused head and chest) and the abdomen. They have eight legs, two pedipalps (small appendages near the mouth used for sensory and manipulating food), and two chelicerae (fangs). Paying attention to these details will help you create a realistic drawing.
Understanding the Body Structure

The cephalothorax is typically rounded or oval-shaped, while the abdomen is larger and often more bulbous. The legs are jointed and covered in hairs, giving them a textured appearance. The pedipalps are smaller than the legs but can be quite prominent, especially in males. The chelicerae are usually hidden but can be visible depending on the pose. Observing these key features will help you portray the spider’s overall form accurately. Consider how these sections relate to each other in terms of size and proportion.
Breaking Down the Legs
The legs of a tarantula are long and segmented. Each leg consists of seven parts: the coxa, trochanter, femur, patella, tibia, metatarsus, and tarsus. These segments give the legs flexibility and allow the tarantula to move swiftly. When drawing the legs, pay attention to how they connect to the body, the angles of the joints, and the way they curve. Adding small hairs to the legs can significantly enhance the realism of your drawing. Observing real tarantulas or images will give you a better understanding of the leg structure.
Step-by-Step Drawing Guide
Now, let’s put our knowledge into practice with a step-by-step guide. This will help you break down the drawing process into manageable stages. Start with light sketches, gradually adding detail and shading. Remember, drawing is a process; don’t be afraid to erase and adjust your work until you are satisfied with the result. The goal is to capture the essence of a tarantula, not to create a perfect replica, especially when you are just starting.
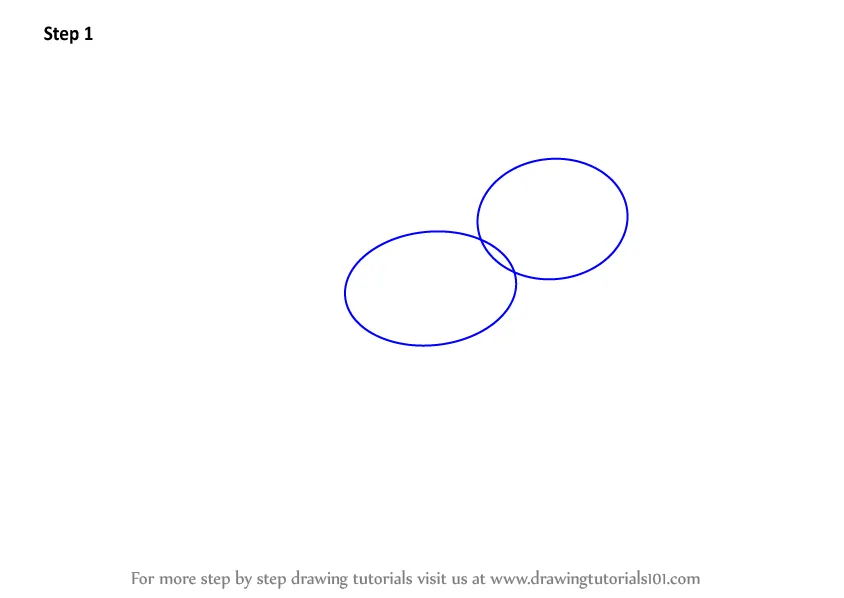
Step 1 Sketching the Body
Begin with a light sketch of the cephalothorax and abdomen. Use a pencil and lightly outline these shapes, focusing on the overall proportions. The cephalothorax should be slightly smaller than the abdomen. Ensure the shapes are proportionate to each other. Don’t press too hard on the paper, as you may need to make adjustments later. Remember, this is the foundation of your drawing.
Step 2 Adding the Legs
Next, sketch the legs. Start by lightly outlining the basic shapes and positions of the legs. Tarantulas have eight legs, so consider how they are positioned relative to the body. Draw the legs in a way that reflects the tarantula’s stance and the position you want to depict. Make sure the legs are proportionate to the body and spaced evenly. Remember that the legs are segmented, so you should start to visualize the divisions within each leg, marking the joints and the different sections.
Step 3 Detailing the Body
Once you have the basic shapes of the body and legs, start adding details. This includes adding the pedipalps, chelicerae, and any other distinguishing features of the tarantula. Look closely at reference images to see how the legs connect to the body and the arrangement of the hairs on the legs and body. The chelicerae and pedipalps can add character, so be sure to capture the details, such as the shape and form. Begin adding fine details to the legs, such as the individual segments and the hairs.
Step 4 Adding Texture and Shading

Shading is key to bringing your tarantula drawing to life. Observe how light and shadow fall on the spider’s body and legs. Use varying degrees of pencil pressure to create different tones. Start with a light layer of shading and gradually build up darker tones in areas where shadows fall. This will help create a sense of depth and dimension. A blending stump or tortillon can be very useful for smoothing out the pencil strokes and achieving a soft, realistic texture.
Adding Shading Techniques
There are several shading techniques you can use, like hatching, cross-hatching, and stippling. Hatching involves drawing parallel lines, while cross-hatching involves drawing lines that intersect each other to create darker tones. Stippling involves using small dots to build up shadows. Experimenting with these techniques will help you find the style that works best for you. Think about the direction of the light source and how it affects the shadows on the tarantula.
Essential Shading Tips
To create a realistic drawing, pay close attention to the direction of light and shadow. Identify the areas where the light hits the tarantula directly and where the shadows fall. Use a softer pencil for darker areas and a harder pencil for lighter areas. Blending the shading with a blending stump or your finger can create a smooth transition between tones. Remember to keep the highlights clean and untouched to give a sense of realism and create the illusion of three-dimensionality. Don’t be afraid to experiment with different techniques to find what works best.
Step 5 Refining the Drawing

The final step is to refine your drawing. Check the overall proportions, make any necessary adjustments, and add any final details. Ensure that the shading is consistent and that the highlights are well-defined. Erase any unnecessary lines and smooth out any rough areas. This is your chance to make any final improvements and perfect your artwork. Stand back from your drawing and assess it from a distance to see if anything needs to be changed.
Common Mistakes and How to Avoid Them
Even experienced artists make mistakes, so don’t be discouraged if your first attempt isn’t perfect. Recognizing common mistakes and learning how to avoid them will help you improve your drawing skills. The more you practice and learn, the better you will become.
Incorrect Proportions
One of the most common mistakes is getting the proportions wrong. This can make the tarantula look unrealistic. To avoid this, start by lightly sketching the basic shapes and measuring the proportions before adding details. Use reference images and compare the different parts of the tarantula to each other. Make sure the cephalothorax, abdomen, and legs are the correct sizes relative to each other. If something doesn’t look right, take a step back and assess the proportions.
Overlooking Shading

Shading is essential for adding depth and dimension to your drawing. Many beginners overlook shading or don’t apply it effectively. To avoid this, study how light and shadow fall on a tarantula and use different pencil pressures to create a range of tones. Practice blending the shading with a blending stump or your finger to achieve a smooth transition. Even simple shading can make a drawing look much more realistic and polished. Pay attention to the direction of light and where the shadows fall to add depth.
Practicing and Improving Your Skills
Drawing, like any skill, improves with practice. The more you draw, the better you will become at capturing the details and nuances of tarantulas. Don’t be afraid to experiment with different techniques and styles. Set aside time regularly to practice and focus on specific areas where you want to improve. The more you practice, the more comfortable you will become with the process. With each drawing, you should notice improvement.
Drawing Regularly
The key to improving your drawing skills is consistent practice. Aim to draw regularly, even if it’s just for a few minutes each day. Regular practice helps you build muscle memory and develop a better understanding of form and perspective. Start with simple exercises, such as sketching basic shapes or practicing shading techniques. Gradually increase the complexity of your drawings as you gain confidence. Set realistic goals and celebrate your progress along the way. The more you draw, the more natural it will become.
Seeking Feedback

Asking for feedback is a great way to identify areas where you can improve. Share your drawings with other artists or art enthusiasts and ask for their opinions. Be open to constructive criticism and use it to guide your learning. Look for feedback on areas such as proportion, shading, and details. Don’t take criticism personally; instead, use it as an opportunity to learn and grow. Also, look at online art communities where people can share their works and critique others’ works.
Referencing Real Tarantulas
Using reference images is crucial for creating a realistic drawing. Gather a collection of photos of tarantulas from various angles. Study the details of their anatomy, such as the shape of the body, the arrangement of the legs, and the texture of the hairs. Observe how light and shadow play across their bodies. Use the reference images as a guide, but don’t be afraid to add your own artistic flair. The more you study real tarantulas, the better you will understand their form and create more compelling drawings.